Entity Framework migration files can pile up quickly, especially during the early stages of a project. While having multiple migration files isn’t inherently bad, managing them can become a challenge as they grow in number. Imagine having 50, 100, or even more migration files—I’ve seen it happen! At that point, resetting entity framework migrations to a clean state becomes a smart move. In this article, I’ll walk you through how I reset my migrations, when I choose to do it, and the guidelines I follow to keep things manageable.
But before we dive in, I’d like you to run a quick check on your project. Use the command dotnet ef migrations list (or Get-Migration if you’re using Visual Studio) and let us know in the comments how many migrations you currently have.
Before You Reset: Important Factors to Evaluate
Resetting your Entity Framework migrations isn’t always straightforward—it can be easy or complicated depending on several factors unique to your project. Before you proceed, it’s crucial to evaluate the following questions.
Are you the sole developer on the project, or are you working with a team? If it’s a team, is it large or small? Is your project still in development mode, or have you moved into staging or production? How do you handle deployments—do you push changes directly to production, or do you have a staging phase? Do you apply migrations automatically to the database?
Moreover, consider the structure of your database. Are you working with a single database, or is your project built on a multi-database (multi-tenant) architecture? Do you have one DbContext or multiple? also do you have existing migrations with custom code?
Each of these factors can significantly impact the complexity and approach to resetting your migrations, so it’s essential to assess them carefully before making a decision.
EF Migrations in a Nutshell
I’m not going to dive into the full details of migrations—that’s already well-covered in the Microsoft Docs. Instead, I’ll focus on the key aspects we need for this process.

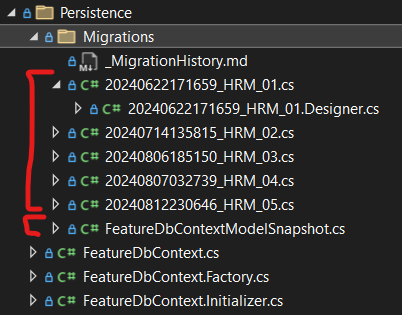
EF migrations are essentially source files that describe the changes made to your models as tracked by the DbContext. They are crucial for keeping your database schema in sync with your code. Each migration is represented by two files, both containing the same partial class. The first file holds the Up and Down functions, which define how to apply and revert the migration. The second file, suffixed with .Designer.cs, contains the models snapshot as it was at the time of the migration.
In addition to the migration files, there’s also a file named [YourDbContextName]ModelSnapshot.cs. This file contains a C# class that holds the current state of your models. EF Core uses this snapshot to determine what has changed when generating the next migration.
What’s particularly important are the Up and Down methods. In some cases, you might need to customize these methods to meet specific project requirements, such as creating triggers or stored procedures. If you’re working on an existing project, it’s crucial to review every migration file to check for any custom code. If you find any, make sure to note these migrations for future reference.
The key takeaway is that the migration files, along with the [YourDbContextName]ModelSnapshot.cs file, collectively contain the entire definition of your models and database schema. We apply these to a database to ensure it matches the current state of our code.
Side note
If you’re a solo developer working on a project that’s still in the development phase, there’s nothing to worry about—the process is straightforward. You’ll find that even the steps to perform the reset are simple. What complicates the reset is the precautions needed when working on a project that has been deployed to staging or production. That’s why I’ll outline the entire process, allowing you to pick and choose the steps that are relevant to your situation. However, for the purpose of this guide, I’ll cover the most extreme edge case.
When should i do the reset?
The first question to ask is: When is the perfect moment to do the reset? Here, I’ll share my own strategy, which you can use to inform your decision. For me, there are three key situations where I consider a reset:
- First Case:
During the development phase, we often go through multiple iterations of the project, typically deploying beta versions to staging. When the decision is made to move to production with the first official version, that’s when I plan to reset the migrations. - Second Case:
Once the project is in a production environment, we continue to push updates. When a major version update occurs—such as moving from version 1.0.0 to 2.0.0—it’s a good time to consider a reset, especially if we’ve accumulated a significant number of migrations. Remember, we already did the first reset when moving to production with the initial version, so if there aren’t many migrations since then, you might want to wait for the next major version. - Third Case:
If you’ve followed my previous article on my strategy for naming migration files, you’ll know that I use a counter-based naming strategy capped at 99. In the rare event that we reach 99 migrations, it’s time to plan a reset—going beyond that is not allowed. It’s simply too many, and I prefer to keep it manageable.
One important thing to mention: if you have multiple environments, such as Dev, Staging, and Production—or even just Dev and Staging—there’s a crucial condition that must be met before performing a reset. All database schemas across these environments need to be in the same state, meaning they should all have the latest migration applied. If there’s any difference, it’s advisable to wait until all environments are in sync before proceeding with the reset.
First step: Backup
The first step toward resetting your migrations is creating a backup, especially if you’re in a production environment. While you likely have an automatic backup policy in place for production, if you don’t, it’s crucial to perform a manual backup in case anything goes wrong.
Start by backing up your database. Next, back up the migrations folder in your project. To do this, simply make a copy of the migrations folder and save it in a different location, such as your ‘Documents’ folder. Once everything is backed up, you can proceed to the next step.
Step two: Clean up
Now it’s time to clean up by deleting the migrations folder, which contains all the migration files and the ModelSnapshot file. After the deletion, you’ll need to generate an initial migration. Run the command dotnet ef migrations add <NAME> (or Add-Migration <NAME> if you’re using Visual Studio). This will create a new migrations folder with a single migration file.
Next, check your notes for any migrations that contain custom code. If there is, go to the backup copy of the migrations folder and find those migrations. Carefully copy the custom code into the newly generated migration file. The order is important here, so take some time to place the custom code correctly—typically, this will be at the end of the Up and Down functions. Once everything is in place, you can proceed to the next step.
Step three: Assert
To ensure everything is in order, you can optionally perform this step. I usually run the command dotnet ef migrations script (or Script-Migration if you’re using Visual Studio). This command generates a SQL script, which I then use to create a temporary database in my local development environment. After running the script, this temporary database should look exactly the same as your Dev, Staging, and Prod environments.
If something is missing or there’s an error, you’ll need to review the generated migration file to locate and fix the issue. This step is especially useful if you have custom migration logic that needs to be verified. Once everything checks out, you can move on to the next step.
Step Four: Database
Now it’s time to update the database. First, we need to clear the __EFMigrationsHistory table by running a SQL command: DELETE FROM [__EFMigrationsHistory] (adjust the command as needed for your database engine; this example is for SQL Server). After deleting all records, we need to insert a single record.
Using the SQL script generated in the previous step (dotnet ef migrations script), scroll to the bottom of the file and locate a SQL statement that looks like this:
INSERT INTO [__EFMigrationsHistory] ([MIGRATIONID], [PRODUCTVERSION])
VALUES (N'<full_migration_timestamp_and_name>', N'<EF_version>');
Copy this command and execute it. This will insert a single row into the __EFMigrationsHistory table, indicating that the initial migration has already been applied.
Make sure to apply this step to all databases in each environment.
Final Step: Communication
After completing the reset, it’s important to communicate with your team, if applicable. Everyone needs to update their local development environment to ensure consistency. First, all team members should pull the latest changes to have the same migration state. Additionally, they need to update their local database’s __EFMigrationsHistory table as we did, ensuring everyone is in sync. This will allow the development to continue smoothly without any conflicts.
Note: If you have multiple DbContexts or multiple databases, simply repeat this process for each one.
Conclusion
Resetting Entity Framework migrations can seem like a big task, but it’s an essential step for keeping your project organized. In my experience, taking the time to do it right can save you a lot of headaches down the road. A fresh start with your migrations makes database management easier and helps prevent issues when updating your project.
Before you dive into a reset, make sure you’ve carefully considered your project’s specific needs. I hope this guide has made the process clearer and more manageable. thank you for reading.


Very well written post.You made resetting pretty simple.
Thank you for your kind words! I’m glad you found the post helpful and the process simplified.