EF core is one of the most used ORMs in the .NET ecosystem, and Multi-Tenancy architecture is the go-to architecture when developing SaaS products. As a result, the likelihood of you combining both is unquestionable.
What is Multi-Tenancy architecture?
before we start with the actual implementation, let’s first understand what this architecture is about, and why we should care about it.
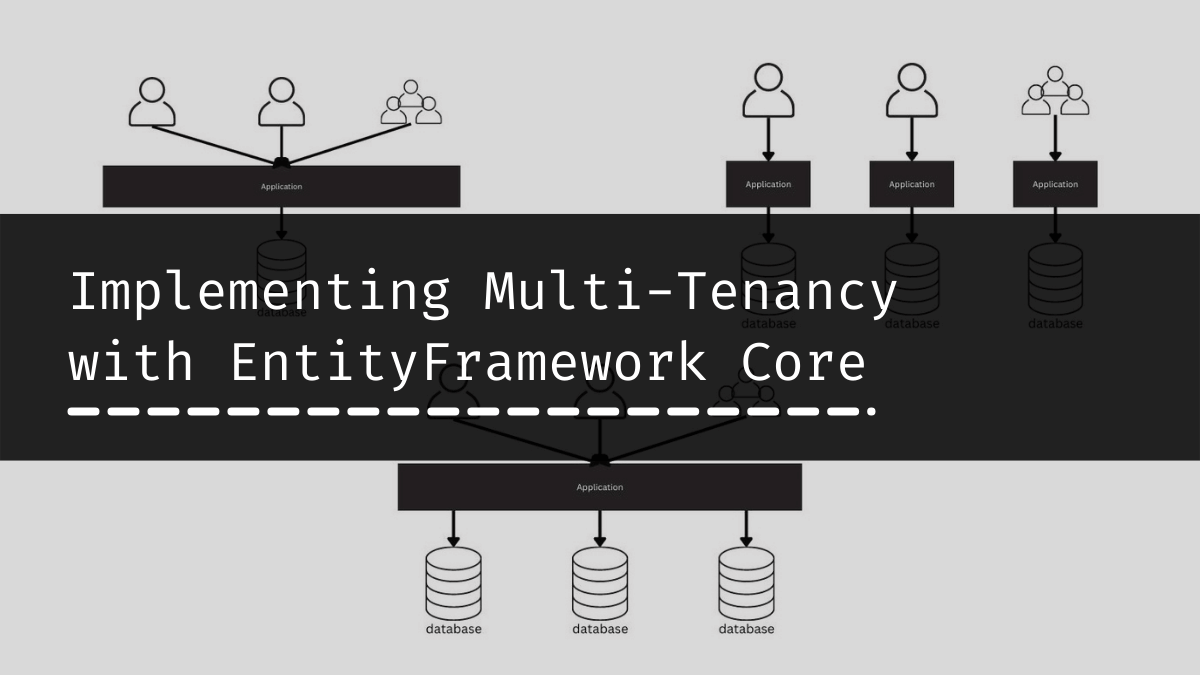
In a nutshell, Multi-Tenancy is an architecture that allows us to share computing resources among several users while maintaining data isolation, where a user (or group of users) is called a tenant.
when considering this architecture there are 2 models that you can implement:
1- Single-Tenant:
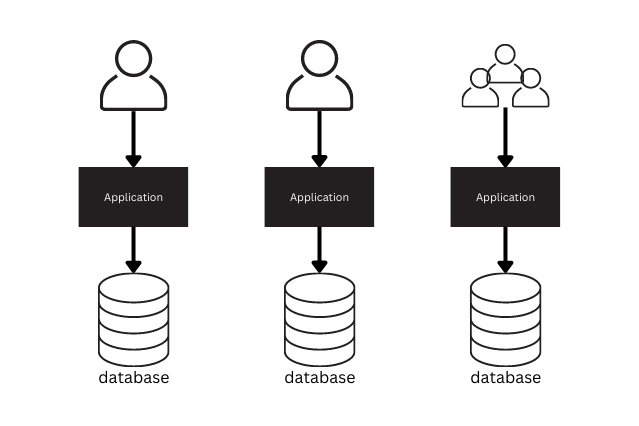
Using this model, we allocate dedicated computing resources to each tenant (user or group of users), allowing each instance to be maintained and developed independently.
This approach is the simplest one, where you develop your application as a single tenant will use it. this way you can be sure there is no data overlapping or leaking.
2- Multi-Tenant:
2-1- Database per tenant:
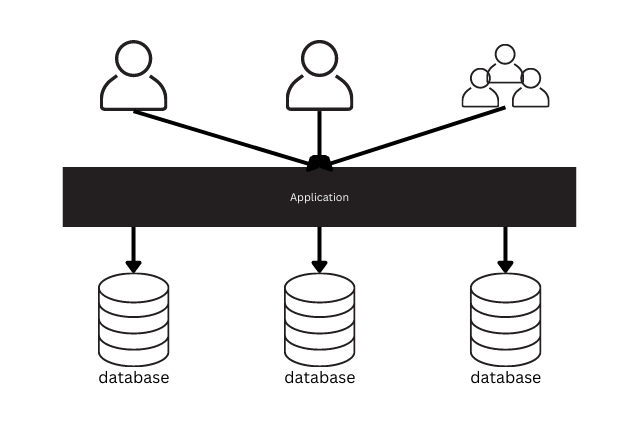
This technique enables us to share computational resources among our tenants, where a single application instance is accessed by several tenants, but at the datastore level, we ensure that each has its own instance.
2-2 Single database

same as the previous one, the only difference is we store all of our tenant’s data in a single data store (database)
I tried to keep it short and avoid going into too many specifics, but I encourage you to do more research on this subject. There are numerous resources accessible to assist you in better understanding it.
EF Core implementation
now let’s start with the actual implementation
1- Single-Tenant:
When working with this model, there is nothing to configure because, as previously said, each tenant will have it own instance, ensuring that the data we access is all for the same tenant and that there is no overlapping or leakage of data. with that, you can use EF core with its normal configuration and access the data without any concern.
2- Multi-Tenant
With this approach, we have a single codebase that serves many tenants. As a result, data isolation is necessary, and as we’ve seen, there are two options: a database per tenant or a single database for all tenants.
A. Tenant provider
when a user creates an account in our application we also create a Tenant instance and associate it with the user, and because we may have multiple users accessing one tenant we will have a many-to-many relationship between the user and Tenant.
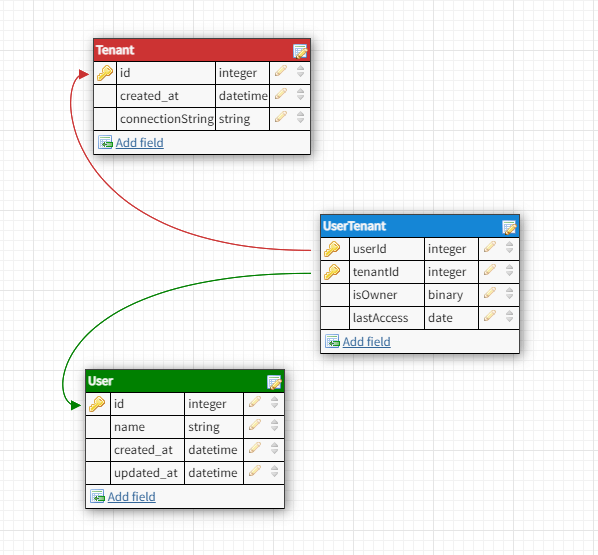
this data will be saved in a central database where we keep all the central configurations related to our application that has nothing to do with the user’s data.
now that we have the tenant’s and user’s information saved, we can start receiving requests, thus the first thing we must do is figure out how to map each request to a specific user tenant, so we must make sure that each request has the tenant id that the user wants to access.
in each request we have multiple options to specify the tenant id:
- query string param: we can include the tenant id as a query string param.
- headers: similarly, we can supply the tenant id via the request headers.
- cookies: also, cookies can be used to set the tenant id.
the next step is to intercept each request and extract the tenant id and retrieve the Tenant info, and this will be accomplished using a custom middleware
public class TenantMiddleware : IMiddleware
{
    private readonly ITenantProvider _tenantProvider;
    private readonly ITenantRepository _tenantRepository;

    public TenantMiddleware(ITenantProvider tenantProvider, ITenantRepository tenantRepository)
    {
        _tenantProvider = tenantProvider;
        _tenantRepository = tenantRepository;
    }

    public async Task InvokeAsync(HttpContext context, RequestDelegate next)
    {
        // read the tenant id of the request
        var tenantId = GetTenantId(context);

        // ensure that the request contains the tenant id
        if (tenantId == null)
        {
            context.Response.StatusCode = StatusCodes.Status403Forbidden;
            await context.Response.WriteAsJsonAsync(new { message = "you must supply a valid tenantId" });
            return;
        }

        // try to retrieve the tenant info
        var tenant = await _tenantRepository.GetTenantAsync(tenantId);
        if (tenant == null)
        {
            context.Response.StatusCode = StatusCodes.Status403Forbidden;
            await context.Response.WriteAsJsonAsync(new { message = "you must supply a valid tenantId" });
            return;
        }

        // set the tenant info
        _tenantProvider.SetTenant(tenant);

        await next(context);
    }

    private static string? GetTenantId(HttpContext context)
    {
        // first we check if we have a header value for the tenant id
        if (context.Request.Headers.TryGetValue("tenant", out var headerValue))
            return headerValue.ToString();

        // then check if we have a query string value for the tenant id
        if (context.Request.Query.TryGetValue("tenant", out var queryValue))
            return queryValue.ToString();

        // tenant id is not specified
        return null;
    }
}
so looking at the code, first we try to retrieve the Tenant id from the request headers and then from query string if we cannot retrieve the tenant id we terminate the request.
then we try to retrieve the tenant info by id using the ‘TenantRepository’ if it not exist we terminate the request. here we can also add the user id when retrieving the Tenant Info to insure that the user has access to that tenant so that if he don’t have access to it we terminate the request.
now that we have the tenant info we set it in the “TenantProvider” so that we can access it throughout the request life span.
now that we have our base configuration on how we can store, retrieve and extract tenant info from a request, let’s move to the next step.
B. Database per tenant:
starting with the database per tenant approach, let configure the dbContent to support this model.
As it is clear from the name, each tenant must have it own database instance, so here we need a way to initialize the dbContext with connection string associated with the tenant.
builder.Services.AddDbContext<TenantDbContext>((serviceProvider, options) =>
{
    var tenant = serviceProvider.GetService<ITenantProvider>()?.GetTenant();
    if (tenant is null)
        throw new TenantNotSetException();

    // set the db context to the tenant connection string
    options.UseSqlite(tenant.ConnectionString);
});
I think it should be easy to figure out what’s going on, we will use the “TenantProvider” to obtain the current Tenant instance (the one we set in the custom middleware). and using the Connection string property in the tenant we pass it to the DbContext options, so that each DbContext instance will be set to that tenant database.
and now all we need to do is to inject the db context in our action and everything will work properly
app.MapGet("/books", async (TenantDbContext context) =>
{
    return await context.Books.ToListAsync();
});
C. One Database for all Tenants:
with this approach the data isolation will be on the table level so each model will have a column “Tenant” set to the Tenant Id:
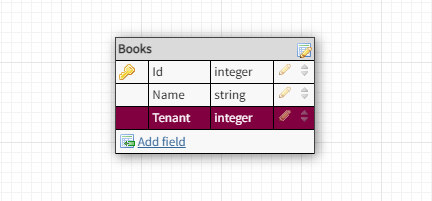
with this we can ensure that each data is bound to a specific tenant, and when querying the data we need to include a filter to only retrieve the data of the current tenant
app.MapGet("/books", async (TenantDbContext context) =>
{
    return await context.Query<Book>().ToListAsync();
});
and in the DbContext we add a query function and apply the filter as follow
public partial class TenantDbContext : DbContext
{
    private readonly Tenant _tenant;

    public TenantDbContext(
        ITenantProvider tenantProvider,
        DbContextOptions<TenantDbContext> options)
        : base(options)
    {
        _tenant = tenantProvider.GetTenant();
    }

    public DbSet<Book> Books { get; set; } = default!;

    /// <summary>
    /// apply a filter on the tenant id and return a IQueryable instance
    /// </summary>
    /// <typeparam name="TEntity"></typeparam>
    /// <returns></returns>
    public IQueryable<TEntity> Query<TEntity>() where TEntity : class, ITenantEntity
        => Set<TEntity>().Where(e => e.Tenant == _tenant.Id);
}
and at the model level (Book entity) we ensure it has a Tenant property using an interface so that the Query Method will only work with tenant based models
public class Book : ITenantEntity
{
    public int Id { get; set; }

    public string Name { get; set; } = default!;

    public string Tenant { get; set; } = default!;
}

/// <summary>
/// interface used to mark the model that are bound to specific tenants
/// </summary>
public interface ITenantEntity
{
    /// <summary>
    /// the id of the tenant
    /// </summary>
    public string Tenant { get; set; }
}
and that all, there isn’t much to it, once you understand the concept, you can extend it and introduce more complex logic to it.
the main take away here is if you are going with Database per tenant the key is to initialize your DbContext with the tenant database connection string, and if you are going with one database for all tenants you need to make sure that all queries include the tenant id filter.
i hope this article is was useful for you, if you have any questions don’t hesitate to post a comment.
the entire source code of this article can be found on Github.
